The Open Concept

Nearly 3:30 AM New Mexico time, perfect time to write a post wouldn’t you say? Most people would say this would be the perfect time to be snug in ones bed dreaming of new paint choices for the spare room, but not my little brain. She thinks 3:30 in the morn is the time to babble on about nonsensical things, like…well…she can’t think of anything nonsensical enough to share at the moment. Maybe, it is too late for my little brain, or too early…there are people in the world who will be getting out of bed in a couple of hours for that morning run, I call those people crazy. They call me crazy for staying up past 10PM. But hey…someone has to YouTube silly cat videos.

Anyway, I’ve been doing a lot besides not getting enough sleep and youtubing silly cat videos. Over the 4th of July weekend (has it really been that long since I blogged about something other than dogs? Or blogged at all? Sad day…), Bubba left me home alone for a full 12 hours. And , I may have done something drastic with all that quiet time in an empty house….

moldywallI seem to have misplaced the memory card that held any before shots, but this is in my kitchen, the wall between the kitchen, utility room, and a small coat closet. Previously, there had been a cabinet in this space, hence the white outline of said cabinet. That’s really how this all started out, I wanted to move the cabinet that we dubbed the “buffet”, which is little more than a cheap free standing piece of cabinetry one finds at Home Depot, to the other side of the stove which currently had only one 3 ft section of counter space adjacent. This would be so much easier if I could illustrate with photos.

Anywho, after moving the cabinet, I began work on a simple wall patch and paint project. Or so I thought, the one little hole seemed a bit soft, so I pulled on the dry wall, and found mold. I was dismayed, and freaked…mold is never good, and is always disgusting. Especially, when you see it in a piece of cheese you’ve just bitten into, but even more so when it’s found in your wall. So, I pulled out a hammer and started to take out more drywall…and then more..and more…until I was left with this huge hole. Then I realized there was mold in the closet too.

This is what my living room looked like when I had to pull the contents out of the closet to remove nasty, green, and slightly frightening drywall…

messylivingroomOy and vey!!

And since no post is complete without a dog photo, here’s Goldie helping me through the process of nasty drywall removal…

goldiehelpingGood dog…

Apparently, there is an old washer hook up that still has water running to it, which I theorize caused the mold and the leak. So, a few days after my “simple patch job” and a good scrubbing with bleach and water, Bubba recapped them and everything seems to be staying pretty dry.

After having removed drywall from the kitchen side and the closet, I was left with the task of covering my newly formed “open concept”  with new drywall.

crookeddrywall

Apparently, I can’t cut a straight piece of drywall. Good thing, I’ve got a day job. The crooked drywall stayed in my kitchen for a couple more weeks mocking me, and my inability to properly use a utility knife. Until Bubba came through, saved the day, and installed some nice even drywall.

fixeddrywall
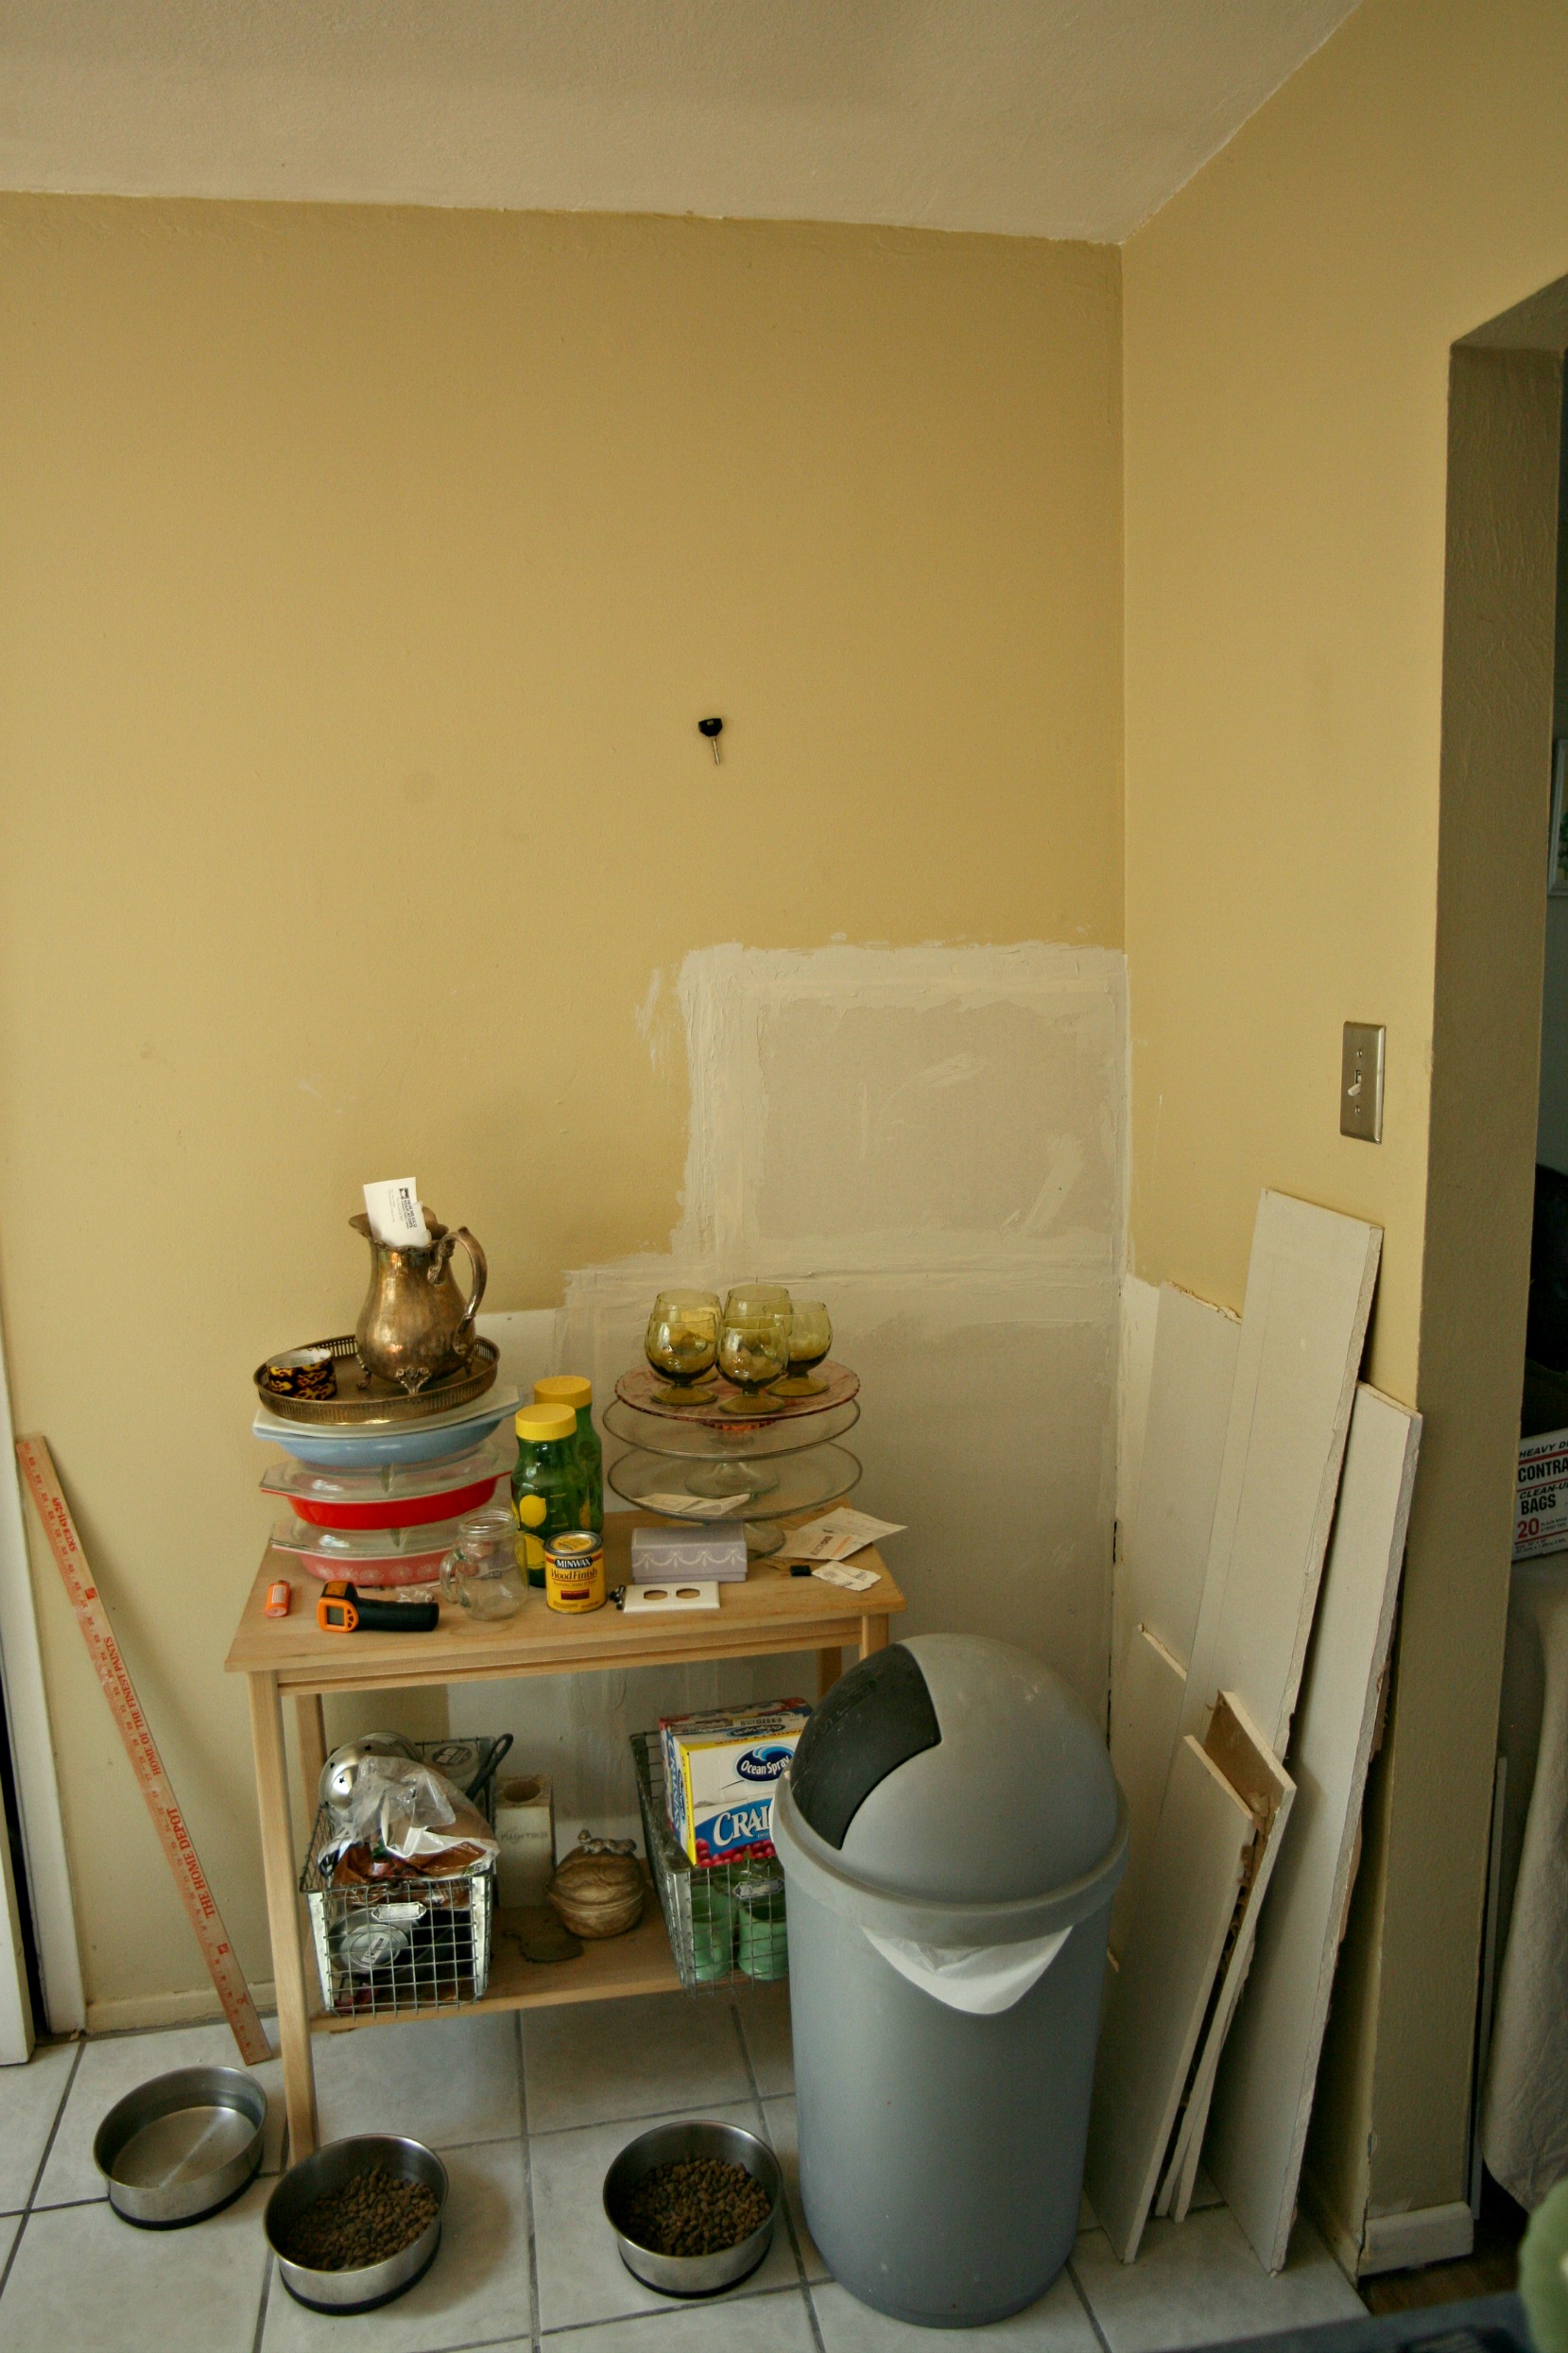
Never mind the mess, nor the spare key on the wall. Bubba wanted to ensure the safety of our vehicle by placing the key in an inconspicuous spot.

So, here’s the straightened out drywall, I did the mudding (is that the proper terminology?). I’m quite proud of it, as you can tell I’ve babbled on about it for nearly 600 words. But darn, this one little project has kicked my butt. Maybe, it’s lack of time and patience on my part, but this project has taken entirely too long for my liking.

We still have to make it pretty, I would like to put some bead board on this wall, with some crown molding. Similar to this..

Via Clarendon Lane

In the mean time, I’ve been finding, shall we say less challenging projects to complete, in the hopes they will fortify my confidence levels.

halfpainted

I’ve now finished painting the front room, took me two weeks including procrastination time, but darn it, I finished something. The new color is the greeny-blue and the old color is that beigy-peach, so technical, Benjamin Moore should hire me to name all their paints! I’ll post photos of this room someday, maybe tomorrow. The room is back together again, so there is something pretty and complete to show you. And since I am currently enjoying annual leave, I’ll have time to take those shots while the sun is still up and pretty. *Insert Dance of Joy*

All this to say, I don’t think my husband will be leaving me home alone again for fear of what I might destroy next. He just doesn’t appreciate the open concept. Who needs walls, we’re all family here.


Advertisement

31 Days: Early Christmas

Two months ago, my sweet mom bought me an early Christmas present, I didn’t take a picture of it in the box or else you’d see it here. My sweet mom gave me a set of flatware, it’s beautiful and shiny and just the right weight. I’m a weirdo and pay attention to the weight of silverware in my hand, I like it be a little weighty, but not so weighty that it falls out of your hand easily.

When I brought my early Christmas present home, I took each piece out and admired it’s shiney beauty, then placed each piece into a large glass vase until I could fix the kitchen drawer that I would be placing my new beauties in. You see, my kitchen still has it’s original cabinets from 1957, with it’s original 4 drawers. Yes, there are only 4 drawers in the entire kitchen, and the top drawer that is typically used for silverware, is narrow and I was always jamming my forks into ledge right above the silverware drawer. Which caused a frustratingly large number of bent forks. A bent fork does not a well set table make.

Anywho, that ledge once held a pull out cutting board, or counter extension or whatever it is you want to call it. Either way, I never used the pull out cutting board because (1) it was nasty and (2) it was super unstable.  Here are the four drawers in my kitchen, you can see where the pull out cutting board once lived.

Also, never mind the nails sticking out of that third drawer. I haven’t pounded them back in so Bubba will get the hint and FINALLY let me go into debt for new cabinets. After four years, I don’t think it’s working.

The other day, as I pulled out yet another bent fork, I decided it was high time I give my shiny new flatware a home.  So, I pulled out my trusty saw, that cuts through old wood like “budda”, and I FINALLY got rid of that annoying little piece of wood that’s been reeking havoc on my forks.

And if I had taken an in process shot of the ledge cutting you would see that here. Instead I’ll show you all of the stuff I pulled out the drawer.

I can’t believe all of that was crammed into that itty bitty drawer, and by the way why in the world do we save those little cracker packs that come with take out salad? It’s not like we don’t have 5 different varieties of crackers in the cupboards. Anywho, after emptying out the drawer and finally cutting through that annoying ledge, it was time to scrub the drawer. Believe me, it needed to be scrubbed, this thing was nasty, and I give the cabinets a good wash down at least once a year.

At one point, I toyed with the idea of painting the old cabinets, so I experimented a little with this drawer. Then I got scared and decided I’d just deal with the old paint a little longer. Maybe I’ll get up the nerve again one day, we’ll just have to wait and see. But back to the dirtiness, see? Even after scrubbing, it was still looking a little less than hygienic, so I decided it was time to just give in and do the old lady thing, contact paper. I hate contact paper, but when you are dealing with old cabinets with splintery wood and chipping paint, and you don’t have the time, patience or gumption to fix the problem, contact paper is an easy solution. And it gave me enough confidence in it’s cleanliness to put my new flatware in it’s new home.

I still need to buy a smallish square container to put in the lower corner, but for now it works. And I get to finally use my Christmas present!!

31 Days: Clearance Plants Part 2

Remember my first Getting it Done post, I talked about purchasing some clearance plants? I planted a few of them in my front yard.

And was about to plant the others in my backyard when, I decided to do a little more research on my new green friends.

And found that they were poisonous to dogs if consumed, that is. Considering my little chewers would likely be munching on my new green friends, I had planned on returning the rest of the clearance plants.

Then I thought about all the other potentially poisonous plants that had been  lovingly chewed on and ultimately destroyed, most of which I inherited when I bought the house. (The plants not the chewing, the chewing came with the arrival of the dogs.) Let’s see, what has been on the toxic menu over the years, there was the Cherry Tree, the Spanish Broom, the Rosemary, which if you look closely in the pictures to follow you’ll see the remnants of. All of these were eaten over a year ago, without any odd reactions. The brat dogs haven’t really seemed that interested in the vegetation in the yard lately so I am hoping they have outgrown this phase. With those hopes in mind, I decided to keep the remaining clearance plants. So, I buried, I mean planted them a couple weekends ago. So far, they are still there, with all branches and leaves remaining undisturbed and uneaten.

Don’t you think they really set off my cinder block wall? Really makes the place seem less prison like doesn’t it? Actually, I’m pretty proud of my fortress (you can read more about that here.), it provides us with lots of privacy, and it keeps the prisoners at bay.

The planting of the shrubs went pretty smoothly, there were no unfortunate water line surprises 3 inches below the surface or anything. I see that as a huge success. Plus, I’m super proud of the three huge holes I dug.

Don’t you love how the dirt and surrounding background is in perfect focus, but the shovel and hole have a lovely bokeh? Apparently, digging a big hole then having to make a nice picture is just too much for this little gardener.

All three shrubs are Privets, I can’t remember the variety of the Privet that lived a year in the big white bucket as his tag fell off during the winter.

The other two are Golden Vicary Privets. All three should get to be 8 to 10ft tall and 8 ft wide, that is if they can survive a dry New Mexican winter. I hear they are pretty hardy, so I have high hopes, and look forward to a nice green and leafy looking wall in a several years. And healthy doggies, let’s hope they can keep their paws off the green stuff.

New around here? I’m participating in a massive linky party for the month of October, if you would like to learn more read this post.

31 Days Day 7: Cleaning Schedule

I thought Sunday would be the perfect day to post a cleaning schedule. Of course, I’m not this organized nor  this talented to have come up with this myself, so feel free to click the picture to be taken to the original source.

Via Discover Create Live

And if all else fails:

Happy cleaning everyone!

31 Days of Getting it Done: Day 1

Do you have things you’ve been putting off for no apparent reason other than the fact you just don’t want to do it? Yeah, me too, I have a house filled with “don’t wannas”. I don’t bring this up  to complain, but to introduce this years 31 Day series, yes, I think I’m a little nuts for doing this again, but it might be fun!

Like last year I am playing along with The Nester’s 31 Days of… , you see every October Nester and a group of her friends get together and blog for 31 days straight including weekends (!). The blog topic should focus on one area, but be broad enough to not bore you to death by the end of the 31 days. Last year Miss. Nester opened this little project up to her readers. So, being the natural follower that I am, I attempted to participate. But also being the non finisher that I am I only got 16 of the 31 posts up. Maybe it was the topic I chose, 31 Days of Treasures , vintage and of the heart. It was a topic I thought I would enjoy, and did until I didn’t. It got kind of old after awhile and I started to worry that I was outing myself as a hoarder.

So, this year the month of October will bring us:

Like most everyone else, I’ve got a mile long to-do list, so over the next 31 Days, I’ll be documenting the peaks and valleys of finally tackling all those projects I’ve been putting off. The focus will mainly be on home projects, but I’ll shake things up with a craft or two. And I’ll try to do projects that won’t require materials or conquer those projects that I’ve already got the materials on hand to complete. Hopefully, you’ll be seeing some pretty big projects finally come to fruition, or you may learn how I organize my toilet paper. Either way, I hope you join me on this bumpy and random ride through 31 Days of Getting it Done.

If you’d like to read what I’ve had to say on these marvelous 31 days please follow the below links:

Day 2: Clearance Plants

Day 3: Autumn in the Living Room

Day 4: Autumn Outside

Day 5: Lolita and Car Repairs

Day 6: Procrastination

Day 7: Cleaning Schedule

Day 10: Sorting the Etc.

Day 12: A Clean House

Day 17: Enjoyment

Day 19: Owls and Monkey Trays

Day 20: The Business of Busy-ness

Day 23: Plans

Day 24: Goose Heads and Dog Beds

Day 25: Clearance Plants Part 2

Day 29: Shoe Hoard

Day 30: Early Christmas

Pretty Pics From Pinterest: Front Porches

Hello, and welcome to Friday!! Fridays have always felt like a holiday to me, everyone seems to be a little more jovial and those smiles  seem to come a lot easier than they do on say, a Monday.  So, with Friday upon us and the weekend knocking at the door, I thought it might be fun to look at some Pretty Pics from Pinterest. Just to get myself in the mood for the weekend, and maybe in the mood to finally get something done around the house. It might be time to review my 2012 Home Goals next week, I fear I may be sorely failing in some areas.

Anywho, since the weather is cooling off a bit and fall is soon to be here, followed by winter (a season I don’t really look forward to, I’m much more of a warm weather girl.) I wanted to bask in all things outdoor, particularly front porches. They seem to be a dying art, at least in the southwest. It’s pretty rare when you see a true front porch on a house out here in the south of the westSo, let the front porch ogling begin.

Via Pinterest via Architectural Digest

Via Pinterest via Country Living

Via Pinterest via Houzz

Via Pinterest via House Beautiful

Have a great weekend everyone!!!

Summer Time

Summer time has got to be my most favorite time of year, along with spring, and fall. Honestly, I could do without winter, the short days of winter, and scraping ice off the windshield on cold mornings when I’m already late for work, and  all the extra layers you have to wear to keep from freezing ones bum off. Yeah, I could live without all of that, but those warmer seasons are bliss for me.  I love the warm weather, especially baking in my car after being in a frigid office all day, the long evenings spent sipping iced tea in the backyard, just perfection. Lately, I’ve been watching our apricot tree spit out fruit like a baseball player spits out to-baccy, not a pretty picture? Well, lets just say our apricot tree is being very productive this summer.

I’ve picked two of those so far, I know it’s not too impressive to some folks but it’s a big deal to this little desertrat.

Do you know how many Silvery Minnows we killed using up their water from the  to get these suckers to grow?

Aside from growing apricots, we’re also growing some water conscience yarrow.

And some Holly Hock weeds, well, they aren’t weeds but they grow like weeds in that they never grow where you want them too. But I’ll take it, they bring color to my barren yard.

I’m not really sure what this little green bush is called, his tag blew away over the winter. I currently have him growing in a pot until he’s big enough to not be rolled on, run over, or eaten by my brat dogs.

Oh yeah, and you may remember my grass fiasco from last year, which can be reviewed here, here, here, and here. Well, the drama continues this year. Although, I must say I am pretty impressed with how things have rebounded this spring. Maybe my grass drama is coming to a close. If only I could keep stinking brat dogs from digging ankle breaking holes in the middle of the yard. Let’s just say I don’t say many nice words when walking across the yard in the dark. I owe you a more complete post on the yard and the grass situation, and how we’ve tried to conserve more water and therefore save more Silvery Minnows that reside in the Rio Grande.

But for the time being, a shot I got of  a bare spot in the grass this year. Looking back at some of the grass posts from last year, makes me feel a little better about the state of things this year. But I am still battling the  stupid brat dogs who keep wrestling over my baby grass so I keep re-seeding in the hope that something will survive.

I complain about falling in dog holes, fighting with destructive wrestling dogs, and worry about the plight of the Silvery Minnow, but all in all, I really do enjoy our yard. And I love that it’s summer time so I can while away my evenings tinkering with grass, avoiding the canyons that my dog-brats have carved into my beloved backyard, and just enjoy the fact that I don’t have to scrape ice off my windshield the next day.

Holy Yellow Cow!

Apparently, I’m becoming one of those once a week bloggers. It was never my intent, I’ve always wanted to be a once a day blogger, gladly gabbing on about the newest happenings at my nest, or sharing that cute picture that I just shot of my puppies or sweet Hubba Bubba.  But alas, I’m lucky if I can scramble on here and quickly type up a post with some pictures thrown in. Actually, that’s not quite true, my posts take thought and time, I edit every single photo you see on this blog and try to be careful with those things called words. Maybe that’s why I’ve turned into a once a week blogger, it’s the time that it takes to put these posts together. Maybe I could become an everyday blogger if I were to include fewer word circles and start eating more potassium to prevent word diarrhea. (Yeah I went there)

Anywho, I’m not really sure how to transition from word diarrhea to how I prettied up my living room, so I won’t. Let’s jump right into the visuals shall we?

Ignore the ugly leashes that are so glaringly obvious in photos, but apparently are completely ignored while living in this space.

So, remember in my last post I finally got to reveal something finished on the ole blog, my oh so beautiful new floors? Well, I didn’t get to talk about how I prettied it up. With the living room having to be completely dismantled to install the flooring, it gave me a chance to finally work with a blank slate. This was a foreign concept to this pack rat, an empty room? With open, flat surfaces? Where does the clutter go?!  Well, the clutter hasn’t gone anywhere it’s just being stored in boxes in the sun room until I can figure out what I want to get rid of and what I want to keep. I am hoping to shake my pack ratty-ness and give away or sell most of the items that don’t have sentimental value to me. There’s just too many things to spray paint in this world for me to be wasting time dusting yet another thrift store knick-knack.

After putting all the furniture back in the room, and enjoying a completely clutter free space for a few days, I was ready to play around with some new accessories. I wanted color, lots of color, it’s summer after all. So, I started out with my new favorite yellow cow.

Yes, I know she’s a creamer, but the Bubba and I aren’t coffee drinkers, and I couldn’t bear the thought of putting Rillo away in a cabinet.(That’s what I’ve named her, short of Amarillo, which means yellow in Spanish. From what I’ve been told.) The flowers I clipped from my now dry and crunchy front flower bed.

Working with Rillo as my inspiration, I pulled items from around the house that would coordinate with her yellow glory. I found that my small collection of globes and a vintage children’s book brought the perfect mix of bright and fun to the room. Perfect for a summer setting on the ole coffee table.

Apparently, I easily fall victim to trends, notice the other globe on the end table in the foreground? Oh, and I can’t forget these guys:

Yeah, I totally went with the  owl craze too, but I never follow a crazy trend  I’m not completely in love with. Those owls and my globes are some of my favorite things in the room. Here are a few others.

C.S. Lewis is awesome, that’s all I’m sayin’.

Monograms are almost as awesome as C.S. Lewis. But the only monograms I  seem to find more readily are A’s. Oh, well, I’ll just be a self centered little A and only have my monogram selfishly displayed.

What changes have you made to make your home more summery?

New Floors

Way back in my post about my visit to the Abo Ruins, which by the way was freshly pressed (I’m still amazed that someone found one of my posts to Freshly Pressed worthy!) I had mentioned that Bubba and I would be ripping out our old stained carpet and replacing it with vinyl plank flooring. Surprisingly, there was minimal gnashing of teeth during this project.

Here’s what we started out with, I had started moving things out and thankfully remembered to take a sort of before shot.

I didn’t realize how beige my house was before seeing these photos. Maybe it’s time to put some new paint on the walls, and more substantial art above the sofa.

I’m almost embarrassed to show this shot, but I’ll show it anyways so you can see a contrast between the before and the after. Those spots you see are “signatures” left by the doggies, they’ve been steam cleaned and scrubbed to an inch of their lives, the carpets not the dogs. With each new stain, the carpets would get spot cleaned and then shampooed, to no avail. The stubborn things would go away for a little while, and then somehow reappear, I called them poop stain ghosts. Since they were haunting me. They are the reason the carpet had to go.

This, the dirt that lurked under the carpet was another reason I wanted to rip it all out. There’s nothing that says home like puffs of dirt coming out of ones floor!

See those ugly brown things? Those are linoleum tiles that were originally put in the house at the time of construction way back in 1957. I don’t even want to think about the risk of asbestos, ignorance is bliss until we all die of lung disease. Anywho,  the remaining tile around the perimeter was holding tack strips down. And underneath those ugly tiles and tack strips was crumbling  concrete.

*Commence gnashing of teeth*

After the tedious act of ripping out the old carpet, prying the tack strips and old tile off the concrete subfloor and finally patching said concrete this is what we had to work with. Yup, that’s a giant crack going down the center of the house, from the end of the hallway all the way to the end of the living room. We tried patching it with some of this concrete patch stuff that the nice Lowes guy recommended, but later found that plumbers putty worked just as well since the concrete patch got a little crumbly when it dried. But don’t take my word for it as I have no idea how the plumbers putty will hold up under the heavy foot traffic that we inflict on our floors.

And that scary looking black stuff is the adhesive from the original tiles from 1957, again, I don’t wanna think about the chemicals lurking within that mess.Thankfully, the sand that was trapped under the nasty carpet pad got rid of anything that was still adhesive-y.

After removing all the remnants of old tile, tacks, sand, and everything else that is nasty it was finally time to start laying down the vinyl planks.

We used Surface Source Vinyl Plank Flooring from Lowes, in Classic Chestnut. At first, I wasn’t too sure about the color, but at .88 a sq ft it was worth a shot.

So, we commenced laying of planks, the first row went down pretty easily. So did the second, third and fourth.

Then we got to that last row in the hallway and encountered some issues. The last row didn’t quite fit around the door frames as well as the first row did, and apparently someone *guiltily looks away* laid the first row of planks slightly askew. It was at this point I stopped taking pictures and started to worry. Thankfully, Bubba was there to help, and sawed at some of the frames a bit to get the planks to fit underneath, just as the instructional video suggests. But either the saw wasn’t sharp enough or the door frames were built of steele, because we were only getting a lot of dust and a major arm work out, but the planks still weren’t fitting underneath the door frame. It being 10 o’clock on a Sunday night, we couldn’t do a thing about it until Monday. So Monday after work, my sweet Bubba ran to the hardware store and bought an oscillating saw. After that, things went much quicker, and the gnashing of teeth finally ceased.

While we were sneezily pulling up carpet, prying away at those annoying tacks, and stressing over door frames, the rest of the house looked like this:

But amidst the chaos there were a few peaceful moments too.

Ahh, yes rest, it does a soul good. With those few moments of cuddle time on the couch we were able to find that final bit of energy to finally get it done. Plus, I was getting really tired of having to put shoes on just to walk through the living room and down the hall.

But not anymore! It’s so nice to have floors without disgusting stains on them! And all the dust stays on the surface just waiting for the daily sweeping or vacuuming. I thought the vacuum wouldn’t work so well on these floors, but it really does a better job of getting that dust and fur up than any broom and dust pan could.

Here’s another view, ignore the ugly Goldie chair, yes we are those crazy people that have a reserved chair just for our dog. I have been on the hunt for a couple of nice dog and people friendly chairs, but for the time being I just use a blanket to protect the hand-me-down that Goldie is so attached to.

 A close up, I have found that vinyl plank flooring is quiet and doesn’t have that plastic-y feel and sound that some laminates have. Plus, it’s generally cheaper than other hard surface flooring and super easy to install. This type of vinyl plank is floating meaning that it sticks to itself not the floor. I’ll have to do a how-to post about it when we do the other rooms in the house. Oh, and we liked this flooring so much we want to replace all the carpeting in the house with vinyl plank. Exciting stuff eh?

womp-womp

It’s been so long since I last posted I don’t know if I’ll be able to put words into sentences. But let’s give it a shot shall we?

I will give you fair warning, this post probably won’t make much sense and will have abosolutely NO structure. So, if you enjoy a well rounded post, then I suggest you stop reading here. But if you don’t mind my ramblings and my random photos, then sit back and enjoy the show!

Recently, I’ve been trying to attack a few of my smaller projects. You know, those projects that don’t really take a lot of time, and really don’t make a huge impact. But they still make me feel good for doing them, because darn it, I’m gonna do something fun!

I saw this idea on Pinterest to make your own murcury glass lamps. I love the look of these, but I hate the price tag, so the thought of making them myself out of cheapie lamps was super appealing. The instructions suggested using Krylons Looking Glass spray paint and  lots of water, but I being the independent rule breaker I am, thought I’d try using a metallic spray paint.

Here’s my set-up:

A $3 Goodwill lamp, and her $3 cream brother in the background. And here’s pinky after my little experiment:

Imagine a big wop-wop sound effect as I studied the results of my labor. The process, is pretty simple, you drench the lamp in water with a trusty spray bottle, then spray it with your spray paint before it dries. It may have worked better if I had started out the with the correct product in the first place, and maybe covered the original pinky mauve with another color before water drenching step. So, I’ll be purchasing some Krylon Looking Glass spray paint to try this project one more time. Hopefully, I’ll end up with results that are similar to this:

Aside from getting a spray paint headache, I’ve also been playing around with art in the living room. Over the past year I’ve acquired quite the collection of discarded art from various thrift stores. Some of them are originals and pretty darn good, others aren’t so good, and still others are prints. I’ve decided I may need to be more discerning about what I bring home, and where I place my works of art.

Here’s my living room art wall way back in August of 2011:

Ignore the girls on the sofa, this is a recycled picture from this post. Honestly though, this is a typical scene in my living room, dogs sleeping on the couch and crooked pictures on the wall.

Here’s my little art wall last week before I started tweaking with it again:

Sorry for the poor white balance, it was night time and I didn’t want to wait until I had better lighting. But back to my art wall, as you can see, I’ve got way too many photos up here that really aren’t connected and brought together the way they should be. So, I took them all down except for the one that I knew I wanted to keep on that wall.

Then after fiddling for a while I came up with this:

Now it looks too sparse, and I’m not really sold on the two yellow bird paintings anymore. It might be time to do some art purging. Back to the drawing board on this one too. Chalk this one up to another womp-womp moment.

Hopefully, this weekend I’ll get a chance to tackle these womp-womp projects and make them into woot-woot projects!!

Have a great weekend folks!